7 Comments
 I LOVE projects! I love that they are another way to assess students and gives those students who are weak test takers another option to show what they know. What I do not love is those students who choose to not complete any project and therefore hurt their grade even more....anyway.... We have switched our 9th graders in Fulton County to Common Core and the county has given us "blueprints" to walk us through each unit. Each blueprint comes with multiple resources that are appreciated! I came across this Mathemagic activity and turned it into a project for Unit 2. (I did not create this, I simply used it!) Students have to create a "math magic" trick where contestants are asked to choose a number and then operate certain steps on that number to get back to the original number or get to a certain number. A great way to introduce the project is be opening with... 1) Choose any nonnneagtive number... 2) Square your number 3) Multiply the result by 9 4) Take the square root of the result 5) Add 15 to the result 6) Divide the result by 3 7) Subtract 5. It's your original number! I wish I had a magians hat for the occasion...oh well... Students had to do the following with their trick: 1) Describe in words 2) Show an example # 3) Show why the trick worked with "x" 4) Justify each step (this showed students that whatever they did they had to undo!) The biggest weakness was showing why the trick worked with the general example "x." They enjoyed it and we had fun taking 5-10 minutes for a few days for the students to amaze their classmates with their tricks!
“If you can't explain it simply, you don't understand it well enough” --Albert Einstein If a student understands a topic they can teach it to anyone. I have used "Teach the Class" projects before (as explained in a previous post) but I wanted something more defined. I had both of my preps choose a topic (that I had predetmined) to present in the video. Now, I gave each group the breakdown of what type or problem I wanted them to present on and an example to model off of. They had either a 1 or 1.5 days in class to finish the problems that they would present on and turn those into me and then 2 full days in class to record/upload/edit their video. Students could NOT record until their problems were checked and approved by me. Then I created playlists for each class on my YouTube account and we watched the video as their review for their final test. Each topic that was presented was a review topic--not real sure how I feel about this as a method for all students to learn 10 new topics. Most groups worked really really well and created great videos! As a class, we then spent 2 days watching the videos. This served as their review for their final test! I also brought in popcorn for one day and set up the seats auditorium style. As a double bonus--these videos were available for them to watch at home in preparation for their final test. Important Notes/Reflections: 1) Limit the number of problems each group presents--aim for the videos to be between 6 and 12 minutes. 2) Limit the number of people in group to 2-3. Any more and it becomes more difficult to film and make sure everyone has an equal part in the video 3) There were a few issues with uploading so make sure to stress the importance of figuring that out with you the teacher asap. I ended up letting the groups that could not upload present in class with some points removed. 4) Also...it can take videos 48 hours to come up when searched for. Whoops! Either make the project due a few days before you plan on showing it or have students e-mail you the link. I do plan on using this project again but I will structure it a WHOLE lot more. Overall, the students enjoyed it and it was great to see all their hard work! Links to Each Classes Playlist: 3rd Period Playlist: http://www.youtube.com/playlist?list=PL97C49542A167ED67&feature=view_all 4th Period Playlist: http://www.youtube.com/playlist?list=PL5622AB2BE01B9A49&feature=view_all 5th Period Playlist: http://www.youtube.com/playlist?list=PL3AC9A5D7DFB5CCDF&feature=view_all 7th Period Playlist: http://www.youtube.com/playlist?list=PL3029588AC30DBD28&feature=view_all 8th Period Playlist: http://www.youtube.com/playlist?list=PL0F7EF5E935C9E604&feature=mh_lolz
During November 2010, I went to the Tennessee Independent Schools Bi-Annual conference held at the Baylor School in Chattanooga, TN. I was impressed with Baylor's picturesque campus, campus dormitories (which I did convince a teacher from Baylor to sneak me into on-way, way larger than my closet of a room at Tech), and their amazing math department who are incredible innovative. My first post about chalking was from one of the teachers from Baylor. I sat through a presentation on how a 7th grade teacher had her Pre-Algebra kiddos create an 3-D animal from paper towel rolls, shoe boxes, and similar material and then find the area and volume of their animal. Her Algebra students where jealous so she had them draw animals on graph paper (using all straight lines) and then find the equations of particular lines. This the part that I borrowed! I did this project with my 7th graders in Memphis and then my 9th graders in Atlanta. The class subjects are the same so the material was relevant to both. For both classes I asked them to draw an animal on graph paper using only straight lines. I did not tell them what the purpose was. My 7th graders completed this while having a sub one day and my 9th graders completed this for homework the night after a test (100% completion rate!) I also had them go over their final animal in pen. I then collected them and made a photocopy of them. The students got the original back and their copy. I asked them to decorate the copy and use the original to somehow label the lines they defined on a separate sheet of paper. The final version included the original animal, the decorated animal, and then the equation sheet on a poster board with the rubric on the back. Reflections: 1st: Will do this project again 2nd: Took forever to grade so may consider this a partner project to lessen the grading part 3rd: Will allow more class-time to work on the project 4th: Will use strong student examples from the past in the introduction of this project 5th: May expand theme on animals to something like school spirit
One of my favorite things about teaching is showing my students how what we cover in class is used the real world-other than word problems. While I do not do this as much as I wish I did, I do take personal victories when I am able to! I have found that projects are a great tool for this. While covering ratios/scales in my Pre-Algebra class last year, I noticed there where a number of problems centered around architecture. I decided to create a project where my students would create a scale drawing of a house and then create a scale model of the house. For the sanity of my students, their parents, and me, they could only create drawings/models of one-story houses. My students begged and begged to let them create multiple story houses but I knew the model would be a bit too time consuming for a 7th grade math project. (All I could think about was how much time that my friends at Tech that were architecture majors spent in studio and I knew I had to scale this back!) To make sure my students were not completing this in one night, I had 3 check-points over a month before the project was due. They were as follows: 1st: Rough Drawing of your house with dimensions 2nd: Scale Drawing of your house with rooms labeled with their purpose (cannot be on graph paper) 3rd: Scale Drawing of your house with dimensions (actual and the scale measurements) I also allowed my students to have 1 workday in class to construct their house. This allowed me to help them and give them pointers on glue and cutting. This also gave me time to redirect those who were WAY off point. This was my first time doing this project and so are some kinks. I ended up making copies of everyone's scale drawings so that they could build the house on that. Changes I would make next time:1) I would limit the size of paper used for scale drawing to 8.5 x 14 in (the bigger the paper, the bigger the house)2) I would set the scale that student's use to 1in to 1ft or 1cm to 1ft The range of what I got was staggering! They did look awfully pretty on my window seal though! I am including pictures of projects that exceeded expectations, meet expectations, and did not meet expectations. This project can be purchased on my Teacher's Pay Teachers store! Happy President's Day! Apparently I remember to post on holidays! In Fulton County we had Friday and today off. We had a school shooting threat on Thursday which meant in my 2 Math 3 Support classes I had 5 students in each class-I opened their eyes to Dilbert and helped some study for their upcoming Math 3 Test. Thursday really felt like a teacher workday and I got a good bit of stuff completed. Nothing happened on Thursday and honestly with all the police and undercover detectives (used very loosely since we all could tell who was undercover) I have never felt safer. On to the post... Georgia introduced Math Support classes during the 2008-2009 school year. These classes are meant to be an extra period of "support" for students who struggle with the material in their gen-ed math courses. The structure of the classes are typically open to each school. Some schools have students with the same teacher for their gen-ed and support class, some have one specific teacher who teaches all the support, some have a mixture. It is only in its 4th year and schools are still experimenting with different approaches to the course. At my first teaching job I was on traditional block scheduling (kids had the same 4 classes for a semester and then switched) and only taught one Math 1 Support Class. I had some overlapping students in gen-ed math and the support math. Which, I was okay with. It did mean those students spent half their day with me for a semester but fortunately, they were students I had a great relationship with. I was at a Title 1 at the time and all the students I had overlapping passed the EOCT and did great! When I moved to CHS this past fall, I knew I would have 2 sections of Math 3 Support. A big struggle with support classes is how do you engage students who probably get easily frustrated with math/do not like the subject? Instead of a final last semester, I broke the students up into groups of 3-5 and had them teach the class. I let them pick a topic that was covered in Math 3 and then I had to approve it. This gave the opportunity to redirect their choices into doable topics. For example, a group choose matrices and I had them narrow it down to finding the dimensions and the determinant of a matrix. I had groups go over three 5-minute classes periods. It went okay. The key is not to give too much class time and have assignments due every day. I learned that in the middle of the project. Also, next time I will require all groups to make a video lesson. I will attaching both the files/rubric and videos once I am back at school. These were fast to grade-I love rubrics! I do plan on editing this project and trying it on my 9th graders in May. I will break them into groups and then give them a list of topics that need to be re-visited before 10th grade.
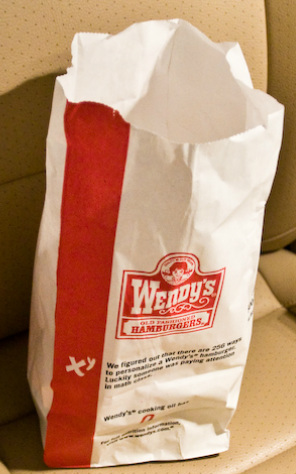 I picked up some food at Wendy's during the spring in 2009. The bag my food was in (picture above) had the following phrase: "We figured out that there are 256 ways to personalize a Wendy's hamburger. Luckily someone was paying attention in math class." I began to wonder how did the marketing team come up with that number? I began to realize that the topic I was soon teaching my 9th graders, permutations and combinations, was more than sufficent math to calculate the number of ways to personalize a Wendy's hamburger. I developed a project based around the bag. In class, we discussed the number of toppings available at Wendy's (9 total) and then decided to use combinations to figure out the number of arrangements possible since order does not matter. Students could easily answer those questions. The hardest part for students was how to set up the calculations. You find the number of combinations of 9 objects (toppings) taken 0 at a time (the number of hamburger personalizations with nothing on it), the the number of combinations of 9 objects (toppings) taken 1 at a time (the number of hamburger personalizations with 1 topping), and continue the process till the 9 are taken at a time (the number of hamburger personalizations with all toppings). Students typically pick up the pattern once started. I let my students use their scientific calculators to solve. 9C0 = 1 9C1 = 9 9C2 = 36 9C3 = 84 9C4 = 126 9C5 = 126 9C6 = 84 9C7 = 36 9C8 = 9 9C9 = 1 Total: 512 ways to personalize a Wendy's hamburger The bag is wrong! I then have students write a letter to Wendy's, requesting the bag to be changed. (They will not, appartently enough bags have been printed for the next 5 years!) I have a rubric to grade the letters and set the peramertors of the letter. This is what I count as the project grade. Each student brings 2 copies of the letter so that I can grade one and send another to Wendy's. Your students get a coupon for a special treat! The activity is a great way to show how permutations/combinations is used in everyday life and in various fields. I have always gotten a positive response to the project and how many times are you given a free frosty at school? EXTRA CREDIT/EXTENSION: Why does the bag say there are 256 ways to personalize a hamburger? Show the math to support your answer. Handouts used in class:
|
Natalie Turbiville
Educator who loves math and working with students. Archives
May 2016
Categories
All
|
||||||||||||||||||||||||
 RSS Feed
